
Border Lines
Border lines are a great way to distinguish between sections in your portfolio. In the default Digication portfolio, there are two borders that are already established: the portfolio title bottom border and the footer top border. These are both solid 2px lines that separate the main portfolio from its title and footer.
Border Statement
Below is a breakdown of a sample border statement:
border: 1px solid #000000;
which border: size style color;
Each section of your portfolio has four borders: top, bottom, left, and right. You can modify a specific border by typing border-top, border-bottom, border-left, or border-right instead of just typing border, which modifies all four borders.
There are three ways to modify Digication borders: size, style, and color. To modify a border's size, you should adjust the px value to a integer between 1 and 4. For color, you simply substitute your own hex code into the border statement.
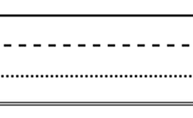
Border Styles
There are four basic border styles in Digication - solid, dashed, dotted, and double - and two complex border styles - inset and outset. Note that with the double border style, your border size will have to be at least 3px, otherwise the browser will substitute a solid border style.
There are four basic border styles in Digication - solid, dashed, dotted, and double - and two complex border styles - inset and outset. Note that with the double border style, your border size will have to be at least 3px, otherwise the browser will substitute a solid border style.
Inset and outset borders are special styles that must be used on all four borders in order to work. An inset border makes an object appear as if it is sinking into a page, while an outset border makes an object appear to pop out of the page. Note that these borders are dependent on color, as they use variants of your hex code to achieve the 3-D look. These borders will not work with very dark or very light colors. If you add an inset or outset border, remember that you may have to go to the "Published" tab in order to see the border.

Inset Border

Outset Border
Rounded Borders
Rounded borders are a special addition to a border's style that requires two extra coded lines. In Digication, you can use rounded borders in the banner (#site_headerimage img), top navigation module (#module_topnav), left navigation module (#module_leftnav), or around the gallery (.m_slideshow). Note that if you haven't already added the banner, left navigation, or gallery methods, you will need to do so before you adjust their borders. To create a rounded border, paste the following code below your border statement:
border-radius:10px;
-moz-border-radius:10px;
After you paste in that code, note that for some containers, such as the top navigation module, you will have to go into the "Published" tab to see the rounded borders.

